Building a Keyboard (from Another Keyboard)
The New Controller
Since the Choc Mini already includes the clearly capable EM78M611E, and the PCB layout already includes a spot dedicated for it, my coworker Shishir Birmiwal suggested that I look into reprogramming it. That sounded like a great idea, but it looks like the required dev kit is expensive, compatible only with Windows, and documented only in Chinese. Probably not worth it. (The chip, itself, is documented in English.)
Other microcontrollers exist, such as Freescale’s MC68HC908JB8, from their HC08 series, which includes a combination USB-PS/2 data port. They even have an application note describing building a keyboard with it.
But the ready availability of the compiler (GCC) and lots of example source code, as well as the large Maker community surrounding the Arduino make the Atmel’s AVR controllers a very attractive choice. The reportedly great open source LUFA USB library is a big part of that. The convenient form factor of the Teensy is also appealing. The Teensy board is built around one of the ATmega parts with a built-in USB port, the ATmega32U4. It may lack PS/2 support, but for my intended use, I can live without that. (The only things I have with a PS/2 keyboard port are my DEC VT500-series terminals. And I can stand to use a more PC-centric keyboard with those, such as a Leopold.)
As discovered in Choc Mini analysis, the keyboard matrix has 6 rows and 16 columns. In addition, there are 4 LEDs. That’s a total of 6 + 16 + 4 = 26 I/O lines required. Unfortunately, the Teensy only has 25 I/O lines. So, I can give up an LED, rewire the keyboard to move the Num Lock key—which takes up an entire column by itself—to another column, or use a shift register or a 4x16 decoder to scan the columns.
For the first approach, I’m willing to lose an LED. I never use Caps Lock, for instance, and I don’t even know what Scroll Lock could do on a Mac. On the other hand, I could envision some Fn-combination that would enable Caps Lock—even though I never use Caps Lock, it could theoretically come in handy, so it would be cool to support it. But I can’t imagine any use for Scroll lock. So I’ll just not connect that LED. That takes me down to 25 I/O pins needed.
(The Switch Lock key is used in the Choc Mini to swap the Caps Lock and Control keys within the keyboard. It seems useful for indicating some other inherent mode or layer switch. It might be handy to keep around for now. Num Lock seems eminently useful for indicating that the embedded number keypad layer is enabled, along with the Num Lock key to enable it. That, however, will go through the host; when the host turns on the Num Lock LED, we’ll enable that layer.)
References
Implementing a USB keyboard requires understanding the Human Interface Device (HID) spec. Fortunately, it’s not too onerous, and two documents are pretty much enough to get you up to speed. I’ve listed other helpful resources here, too.
Fitting the Teensy
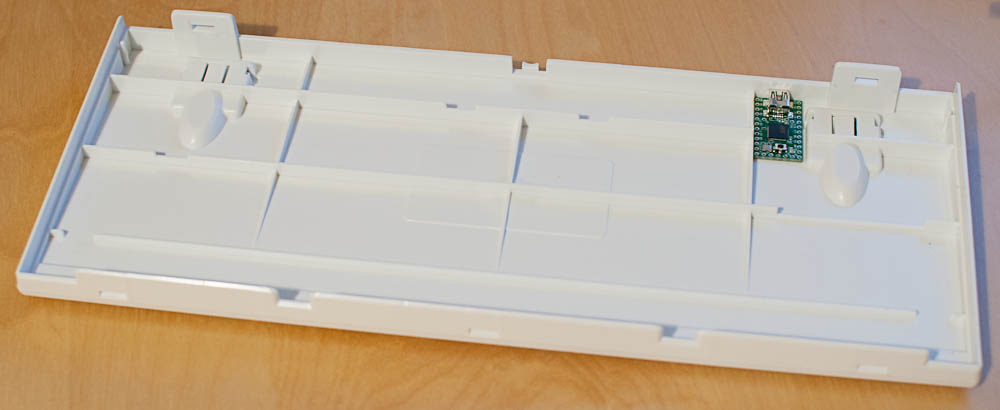
There’s a gap between some of the case stiffening vanes for routing the USB cable. This space fits the Teensy nicely:

Test fitting the Teensy
All I’ll have to do is carve out the proper hole in the back of the case and then come up with some back-stop clip to hold it in place. It should be relatively simple to route some reasonably short wires from this position to the solder pads for the (removed) original microcontroller. I probably don’t even need to worry about a connector between the Teensy and the main keyboard circuit board, although that might be a nice touch.